Parsvabakasana Technique


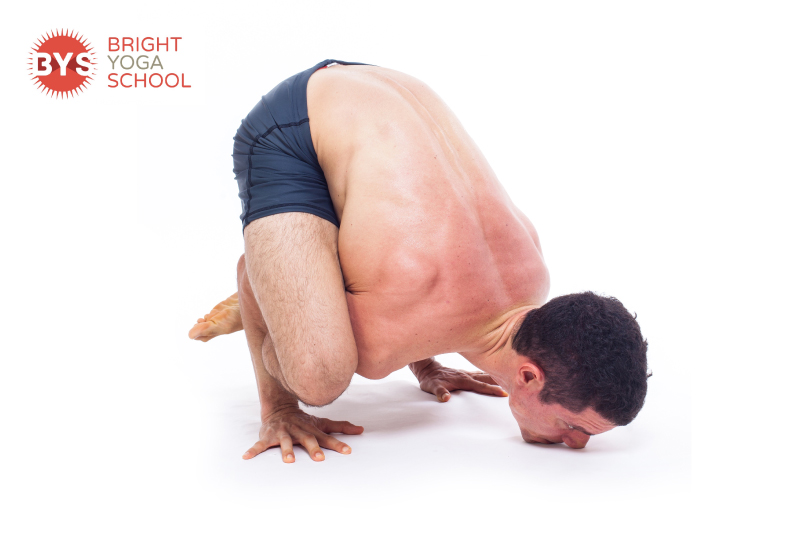
PARSVABAKASANA (SIDE CROW POSE)

Parsvabakasana or Side Crow Pose is an arm balance in the Ashtanga Vinyasa Yoga Advanced Series, as well as in the Rocket 2 and Rocket 3 sequences. This posture requires considerable arm strength, as well as flexibility in the forearm muscles and the thoracic spine, to be able to twist the spine and keep the shoulders balanced as the body weight is held over the hands.

Let us discuss some tips that can help you practice this asana in a safe way…
When you do Chaturanga Dandasana, notice the position of your upper body in relation to and your arms. Slowing down your Chaturanga Dandasana will help you build up a lot of strength to work your way into Parsvabakasana. Here is are some key actions you should pay attention to when practicing your Chaturanga:

Tuck the elbows inward, and keep them close to the body
Keep the shoulders in line or slightly above the shoulders. Aim to create a 90 degree angle with your arms so that you do not collapse the body weight down.
Push the shoulders down to engage the oblique muscles
Squeeze the inner thighs together
Completing your exhale will pull the belly in, creating core activation

Keep these in mind as you review your Chaturanga Dandasana, and remember to
always be mindful of your breath’s quality. Keep practicing this until you feel that your lower plank is solid in terms of breathing and alignment; once your are comfortable here, begin to practice your Parsvabakasana using these same techniques.

Now, let’s talk more about Side Crow Pose… Firstly, for this asana, it is important to take into account that your shoulders should be balanced or in the same line. Avoid collapsing your weight onto one shoulder to avoid imbalance and injury. In order to do this, keeping the legs engaged can make a big difference. When you practice Parsvabakasana, remember to:

Keep squeezing the inner thighs together
Spread the toes
Engage the quadriceps
Actively pull the legs back into the hip sockets

While it may seem like all the body weight is carried on the arms and hands in
this posture, it is just as important to pay attention to the leg activation, as this will actually make you feel lighter on your arms and hands when you lift up. Also, these tips will give you the ability to engage the lower abdominal region and keep your pelvic floor (Mula Bandha) active.

Consistency is always key in the Yoga System, so practice and apply these tips in your daily practice, particularly in your Chaturanga Dandasana. Paying more attention to your alignment and leg activation in this seemingly basic pose will train muscles in your body to help build your strength to get into Parsvabakasana. Keep practicing!

Bhujapindasana Technique


Bhujapindasana (Shoulder-Pressing Pose) is the first arm balance you will encounter when you practice the traditional Ashtanga Vinyasa Primary Series. This pose will require a lot of core activation, and a good way to strengthen the core is to practice Navasana (Boat Pose) and pay attention in all the jumping backs and through. However, Bhujapindasana, like many other postures, will require not only core strength, but also a combination between flexibility and strength in many different parts of the body.

Let’s break this posture down…

First step: preparation. In order to move the legs around the arms, you will need flexibility on your hip extensors (glutes and hamstrings) and adductors (inner thighs). If you can bring your legs around your arms – at least above the elbows – and cross your feet, this could be a good place to stay if you do not have enough strength to move forward to the next step yet.

Second step: crown of the head or chin down towards the mat. Use your exhalation to move all the way down. In this movement, you will need flexibility and strength in different parts of the body at the same time.

In terms of flexibility, your ability to flex the wrist will depend on the flexibility at the back of your forearm and the strength at the front of the forearm – these two groups of muscles will compensate each other in order to stabilize the wrist as you move your chin or head down. To be able to really engage the muscles at the front of the forearm, it is advisable to press the fingertips and the knuckles of your hands firmly down, especially the base of the thumb, index, and middle fingers.

From here, to get into the full version of the pose, it is also necessary to be able to extend your chin without collapsing the back of the neck too much – this leads us into the next aspect, which is strength.

With regards to strength, your core and shoulders have to be able to support you as you move all the way down, as well as when you hold the posture for 5 deep breaths. In order to do this, always keep your back rounded, as this action will help keep your belly or core active. Also, fully exhaling will engage the transverse abdominal muscles. Squeeze the elbows in just enough to engage the muscles on the chest (pectoralis).

Another tip, which can make a big difference in the posture has to do with the legs. Our legs are directly related with the Mula Bandha (the root lock) and the lower abdominal area activation. In order to awaken these areas, keep the toes activated and squeeze the inner thighs together.

If you are new to this pose, and you are worried about falling forward, place a pillow in front of you, or move yourself backwards on your mat, so that you will have a softer surface to support the impact in case you will not be able to control the movement yet.

Remember to always keep practicing and be patient with the process. Dedication and diligence will get you there and beyond =) Have a good practice today!